Posts

Showing posts from 2017

Observations and Conclusions
Image
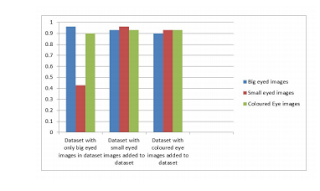
Observations    Graphical Illustration of the differences in accuracy with additions to dataset    The below figure shows the ratio of number of correctly classified images to total number of images for a test set of 30 images. This is displayed in the form of a column chart for different training data sets. On adding new coloured eye images, the accuracy of the model actually drops. This is because the classifier gets confused with more of a variety of pictures. There’s more of a conflict between images in the open set and images in the closed set. This reduces the accuracy. The algorithm to detect the lip based on colour fails as there isn’t much of a gradient colour difference. The classification of yawn using SVM classifier isn’t very accurate. With respect to the blink model, the model would perform better if the mouth area was already localised and the classifier worked on the cropped image. This wou...

Testing Our Models 2

Testing our Yawn detection models We face certain problems with the first yawn method. Usage of the Viola Jones algorithm fails to detect yawns. It detects closed mouths perfectly for all of our test cases - Different sizes and colours do not affect this method. Classification based on colour fails terribly for the test cases where we do not have a stark difference in colour between the skin and the mouth. Using the classifier with a small dataset gives us a high accuracy of 98 percent. On testing this model with images of different types - different lighting conditions different eye sizes, the accuracy drops drastically. Even on including different types of images in the training set, the accuracy is still about 80

Testing Our Models

Image
Testing our Blink Detection models We test the blink model (The differences method) and eye model ( Classifier) with multiple test cases. With respect to the blink model, we test our model with images of: • Different eye colours • Different sizes The first method of finding differences works well with all the above cases as differences are noticed irrespective of the above conditions. The threshold values for the number of white pixels have to be changed for different types. Colored eye bw binary image.  In the second method of training a classifier, we initially have a test data set of only images of a particular eye colour and size.  Results with only one type of image in dataset This model gives us great results for different test cases of similar size and colour. The confusion matrix for this along with average accuracy for each run is displayed. Each run picks a random set of training and test data as mentioned previously. This reduces bias ...

Yawn Detection

Image
Yawn Detection using image processing We add a yawn detector to our system to provide a more complete evaluation process to detect sleepiness. Before we detect yawns, we need to detect the mouth region. To detect the mouth, we use 2 approaches: 1. Use the viola Jones algorithm as we did for the face and eye. This method can be used to detect the mouth but fails to detect yawns. 2.  Find the mouth area based on the colour of the lip. Segment out the red area as the mouth. extract the red plane and subtract it with the gray scale/blue plane/green plane image to get high-intensity values only around the lip region. This can then be labeled as the lip. Figure 6 shows how this works. The red Channel is subtracted with the green Channel in this case to localize the lip. This method doesn’t work unless there is such a drastic change. The other method we’ve used to detect yawns is to train a classifier: This is similar to training a classifier to classify blink. We use the sam...

Training a Classifier

Using an SVM Classifier to detect sleepiness: This algorithm works primarily on the principle that if the person has kept his eyes closed for too long the driver is detected to be sleepy. After extracting each frame from a video, we manually classify each image as open or closed eye. We then separate our dataset of images into training and test data - with 30 percent being training-data and the rest 60 percent being test-data. We do this split randomly. This makes our training and test data different each time we run the program. Using SVM Classifier, we generate a model based on a bag of features. We find the accuracy of the model using confusion matrices. The next step is to feed the video and to get labels as open or closed  for each new frame. Whether the eyes are open or closed in each frame. We keep track of how long the eyes have been closed continuously by resetting a count variable (that counts the elapsed time ) each time the eye opens. If the count is beyond a certain...

Classification of Frames

After converting the cropped eye picture to a binary image, the next step in the workflow is to classify each image as open eye or closed eye. To do so, we take the following 3 different approaches: 1. Finding the differences between consecutive frames 2. Training a classifier 3. Finding the gradient of the image To conclude that the driver is drowsy, we use the following approaches: 1. An average person blinks about 15 times per minute. We count the number of blinks every few seconds and compare it to this. If the frequency of blinks is unusual, we conclude that the driver is drowsy. 2. Every time there's a blink, we keep a timer for how long the drivers eye has been closed. If the time if beyond a threshold, we conclude that the driver is drowsy. Finding the difference between consecutive frames: We take every two consecutive frames and find the difference between the two. We can't see many white pixels in the difference image unless there is a noticeable change...

Eye Detection

Image
The next step in the workflow is Eye detection. CODE:     ed = vision.CascadeObjectDetector('EyePairBig');     BoundBox=step(ed,J);     figure,imshow(J);     for i = 1:size(BoundBox,1)         aaa = rectangle('Position',BoundBox(i,:),'LineWidth',4,'LineStyle','-','EdgeColor','r');     end      %Crop out eye area     for i = 1:size(BoundBox,1)         J= imcrop(J,BoundBox(i,:))         figure(3),subplot(2,2,i);imshow(J);     end    

Face Detection

Image
We implemented the first four steps of the flowchart: We used the VideoReader and read functions in matlab to read a video and extract every frame of the video. We used the inbuilt functions in Matlab for face detection based on the Viola Jones algorithm -  https://in.mathworks.com/help/vision/ref/vision.cascadeobjectdetector-class.html -  https://en.wikipedia.org/wiki/Viola%E2%80%93Jones_object_detection_framework CODE: clc; blink = VideoReader('blinky2.mp4'); for img = 290:291;      b = read(blink, img);     FDetect = vision.CascadeObjectDetector;     I = b;     BoundBox = step(FDetect,I);     figure,     imshow(I); hold on     for i = 1:size(BoundBox,1)         rectangle('Position',BoundBox(i,:),'LineWidth',5,'LineStyle','-','EdgeColor','r');     end     for i = 1:size(BoundBox,1)         J= imcrop(I...

Workflow

Image
We intend to follow these steps :

Introduction

Recently, driver drowsiness has been one of the highest reasons for road accidents. Around 20% of all road accidents are fatigue related and 50% on some roads. Driver drowsiness detection aims at preventing these accidents caused by the driver getting drowsy by identifying so and setting off an alarm to warn the driver. There are many ways to detect drowsiness of the driver : 1. Vehicle Based : Steering pattern monitoring, Vehicle position in lane monitoring 2. Behavioural Based : Driver eye/face monitoring 3. Physiological Based : ECG, EMG etc We aim at studying the Behavioural based approach. References : 1. http://citeseerx.ist.psu.edu/viewdoc/download?doi=10.1.1.458.7214&rep=rep1&type=pdf 2. https://ntl.bts.gov/lib/jpodocs/repts_te/7068.pdf 3. https://pdfs.semanticscholar.org/71bc/acba6bbd44ef330432ce1603c8874ca35d03.pdf 4. https://www.ri.cmu.edu/pub_files/pub2/grace_richard_2001_1/grace_richard_2001_1.pdf